

Basic easy steps to install Apache, PHP, MySql and PhpMyAdmin in Ubuntu
Before we start installing in a clean machine, let’s just update the repositories by running
sudo apt-get update
sudo – (considered as superuser do). it allows user to execute command as superuser specified by security
policy.
apt-get – Basically it’s a tool, APT package handling utility tool – command line interface, which is
automatically update Debian machine and install debian packages.
To install Apache
sudo apt-get install apache2
follow the installation and press ‘y’ when it ask to.
To check the version of Apache (Image-1)
apache2 -version
To check the status of Apache
sudo service apache2 status/restart

sometimes you stuck with this error and unable to proceed with installation.
Error Messages E: Could not open lock file /var/lib/dpkg/lock – open (13 Permission denied)
This error comes when you attempt to open more than one package management process. like in one terminal
you have accessed apt-get to install or remove package and in the same time in another terminal you are
trying to install/remove package..
To install PHP 5
sudo apt-get install php5 libapache2-mod-php5
To install PHP7
sudo apt-get -y install php7.0 libapache2-mod-php7.0
This package contents the PHP5 modules for Apache2 web server
Follow the installation and press ‘y’ when it ask to.
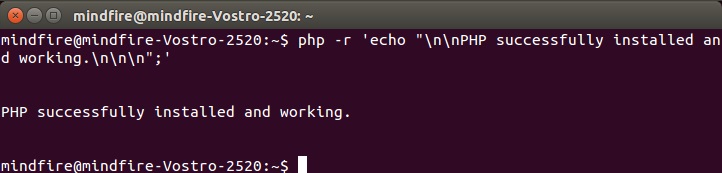
To check the status of PHP
php -r ‘echo “\n\nPHP successfully installed and working.\n\n\n”;’
another way to check if php is working by creating a file named “info.php” inside document root
code:
<?php
phpinfo();
?>
then access it in browser as localhost/info.php
To check the version of PHP (Image – 2)
php -v
It will show the currently installed PHP version.
To install MySql
sudo apt-get install mysql-server
It’s a fast, multi user and robust SQL database server in ubuntu, also available for windows and MAC.
Follow the installation and press ‘y’ when it ask to. During installation you will be asked to put password
for the server. Once the server installation complete. it should start automatically.
To check the status of Mysql Server
sudo service mysql status
To check the version of MySql Server(Image – 3)
log in to mysql server in terminal
mysql -u root -p
put password –
once you get the mysql prompt – type – select version();
it will show the currently installed mysql version. type exit to get out of mysql prompt.

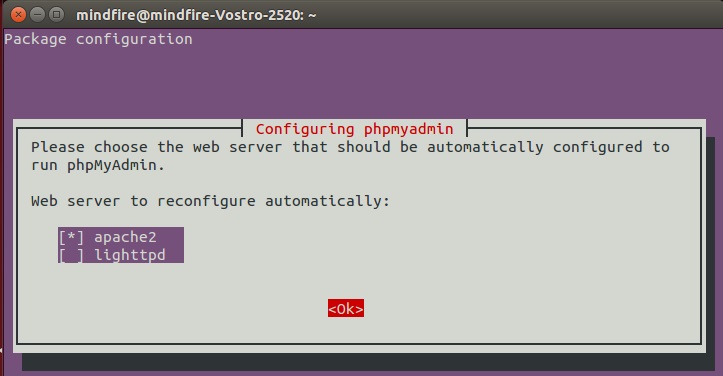
To install phpMyAdmin to access MySql server database.
sudo apt-get install phpmyadmin
It’s a free software tool written in PHP, preferably used to access MySql database server.
Follow the installation and press ‘y’ when it ask to. select Apache2 as web server when it prompts to select and put passwords when it ask to(Image -4)
To check the status of phpmyadmin
Open a browser and type localhost/phpmyadmin
log in with credentials as user name root and password chosen by you while MySql installation.
To check the version of phpmyAdmin
Open a browser and type localhost/phpmyadmin
log in and right side panel will show the version of phpmyAdmin.
Hope I have explained clearly Basic easy steps install Apache PHP MySql and PhpMyAdmin Ubuntu
In my next post I will write how to install apache, php, mysql using tasksel.
You may also like : Some important commands in ubuntu (Fixing an crashed Ubuntu OS )


